EMAIL TEMPLATES
When you navigate to the Email Template section, you are presented with a list of all existing email templates. This page allows you to manage, view, and create new templates.
Navigation
To access the Email Templates:
- Navigate to Master Data in the sidebar.
- Click on Email Templates.
Template List
The main view is a table that displays all the saved email templates with the following details:
- Template ID: The unique identifier for the template (e.g., "XXXXX_Template").
- Category: The category the template belongs to (e.g., "RFQ").
-
Actions: A set of icons to perform actions on each template:
- Edit: An icon to modify the template.
- Info: An icon to view more details about the template.
- Delete: An icon to delete the template.
Above the table, you have options to filter the list and add new templates:
- All Categories: A dropdown to filter the templates by a specific category.
- + New Template: A button that opens the "Add New Template" page, allowing you to create a new email template.
Add New Template
This guide explains how to create and configure new email templates using the "Add New Template" page. This feature allows you to design dynamic email templates that can be populated with data from your collections.
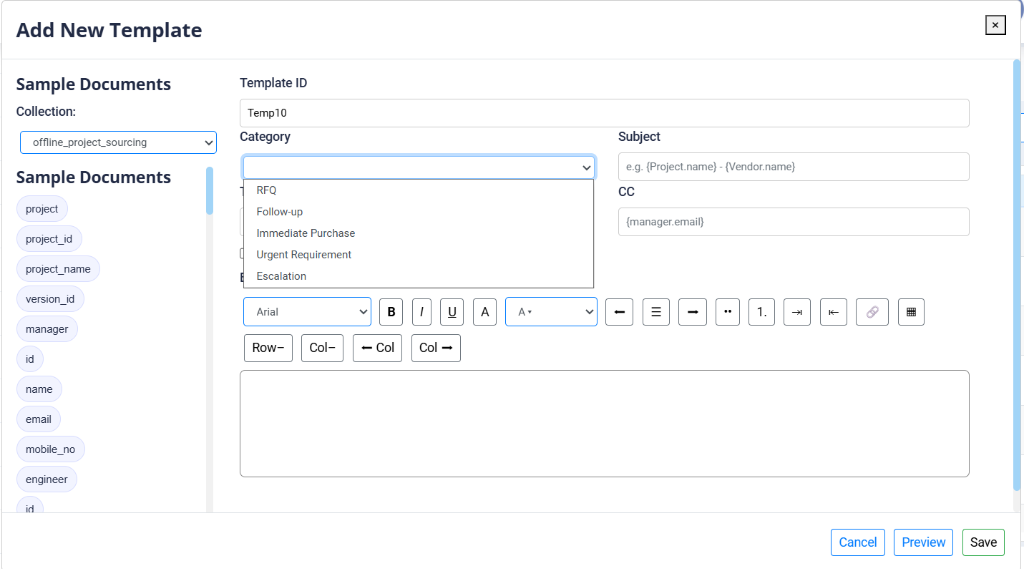
Sample Documents
The left side of the page features a "Sample Documents" section that serves as a reference for creating your template.
- Collection: This dropdown allows you to select a data collection (e.g.,
offline_project_sourcing). The data from the selected collection can be used as variables in your email template. - Data Structure: Below the dropdown, a list of available fields is displayed as chips (e.g.,
project,project_id,manager). These chips represent the structure of a sample document from the selected collection. You can use these fields as placeholders in your template to dynamically insert data.
Template Configuration
The main part of the page is the form for configuring the new email template.
- Template ID: A unique identifier for the template (e.g.,
Temp5). - Category: A dropdown to assign the template to a specific category.
- RFQ: Used for sending Requests for Quotation to vendors to solicit price and delivery information for parts.
- Follow-up: Used for sending reminders or follow-up emails to vendors regarding pending quotes or clarifications.
- Immediate Purchase: Used for high-priority purchase orders where items need to be procured immediately.
- Urgent Requirement: Used to communicate critical material needs that require expedited handling.
- Escalation: Used for escalating issues to higher management or vendor supervisors when standard channels fail.
- Subject: The subject line for the email. You can insert dynamic placeholders using curly braces, like
{Project.name}-{Vendor.name}. - CC: The carbon copy recipient's email address. This can also be a dynamic placeholder (e.g.,
{manager.email}). - Font Family: A dropdown to select the font for the email body (e.g., Arial).
Body Editor
A rich text editor is provided for creating the email body.
- Supports HTML: You can write the email content directly and use the formatting tools provided.
- Formatting Tools: The editor includes standard formatting options such as:
- B (Bold)
- I (Italic)
- U (Underline)
- Color: A color picker to change the text color.
Action Buttons
At the bottom of the page, there are three action buttons:
- Cancel: Discards the new template and closes the window.
- Preview: Allows you to see a preview of the email with sample data before saving.
- Save: Saves the new template to the system.